Wednesday, November 19, 2014

Crafting

OKAY! I have gotten a lot of people ask me how I made my Christmas Wreath this last weekend so I figured well why no just do a blog post!? Since you know it's been awhile. Don't Judge


WARNING: When I first bought my supplies I was super intimidated and nervous because it was so busy and I wasn't copying someone else's wreath, I created my own from my own ideas with some small idea help from pinterest. Honestly once I just sat down and really got into it you get the hang of it real fast and it is super easy!

Supplies:

5 1/2 inch Deco Mesh 
I used Red, Dark Green, and Lime (1 roll of each color]
Pipe Cleaners/ Fuzzy Sticks
I tried to stick with colors that matched my Deco Mesh, until I ran out (1 package)
Wire Wreath
I used a medium I believe (1)
Ornaments
I used Reds and Greens (1 small package)
Ribbon
I used a red/dark green/lime green Chevron Ribbon and Transparent Red (1 red roll and 2 chevron rolls)


Take your Deco mesh and cut about 5-8 inches width. Roll the center tight and let the ends be loose. Roll one of each color and then secure them all together with a pipe cleaner/fuzzy stick, twist tight! The whole Wreath is made of these little bundles of deco mesh. Continue repeating this process the whole time. 


Once you have a few done start tying them onto your wire wreath. The wire wreath should have 4 rings on it making two small spaces and one larger one. Wrap your pipe cleaner/fuzzy sticks-deco mesh bundle in and around the larger space and pull tight! This will help your wreath look full and hide the pipe cleaner a little better. If you are worries about your pipe cleaners/fuzzy sticks showing use the same colors as your deco mesh and tie the bundles tight and close together. I put ribbon and ornaments on mine so I didn't really working about it. 

THE BACK OF YOUR WREATH WILL LOOK UGLY. WHO CARES NO ONE WILL EVER SEE IT. DON'T WORRY ABOUT IT. 


I used these ribbons and ornaments. In between every 4-5 bundle of deco mesh I would tie a chevron and a transparent red ribbon anywhere I wanted on the wire. Make sure they are long enough to see. I used two different sizes of ribbon to add variety. ORNAMENTS GO ON LAST. I arranged them on my wreath to fill in empty spots and add some extra flare. After I found what ornament I wanted were I hot glued them into those places. Just hold them there for a minute to dry and they will hold onto the deco mesh really nicely. 


Tips:

- After you get your deco mesh tied into your bundle pull apart the ends to make your wreath more full.

- Use different widths of deco mesh sometimes to add variety. I was not picky at all.

- Use the same color of pipe cleaners/fuzzy sticks as your deco mesh!! I finally ran out of red and green so I ended up have to use white and let me tell you it is much easier to blend and hide when they are the same color.

- Use lots of sizes, textures, and colors to add variety. It looks so much better!

- I got all of my supplies from Joann's. I had just enough Deco mesh to just buy 1 roll of each color but again, I did not tie the bundles super tight! I even ended up spacing them out even more at the end. I had to buy 1 roll of the transparent red ribbon and 2 rolls of the chevron ribbon and 1 small package of ornaments and less than 1 package of pipe cleaners/fuzzy sticks.

-Use Joann's coupons, they are oh so lovely. I made my wreath for about $25 WITH LEFTOVER SUPPLIES.


HAVE FUN!!

Monday, September 1, 2014

Labor Day // Birthday Weekend

This weekend was filled with all kinds of fun adventures! First off it was Labor Day weekend so of course a 3 day weekend is always something to look forward to but second of all it was my birthday! 21 finally... We packed the weekend with stuff like going to St. George, Brian Head, and the Iron County Fair. I got a really nice camera for my birthday (my sweet hubby spoils me too much) so it was extra fun to take it out for a spin! Enjoy!


We stopped at Cedar Breaks on the way up to Brian Head. Although I have driven past it hundreds of times I don't think I have actually stopped to look at the view since I was little. 


I made it up to the cabin and enjoyed games, food, and of course four-wheeling. My husband is crazy good at four-wheeling including driving fast, and it kind of scares me sometimes. 


On the way home from the cabin we ran into the old car show. We had to stop, and even come back later that night for the carnival. 


I haven't been to the fair in years, let alone any kind of a carnival! We enjoyed our little family home evening/date night being kids again. 


Got to love this amazing hubby of mine! 
He made this weekend, especially my birthday one to remember.


We ended up only riding three rides, one of which was the ferris wheel [of course]. We had planned to do a few more but we had never felt so sick in our lives! I guess 21 snuck up on my faster then I thought! haha no, but we definitely felt like some oldies when we got off the rides feeling nauseous and it didn't even phase any of the little kids. We ended up giving our tickets to a young couple with a little girl and twin boys. The mother was so surprised and grateful. It was a great night. 

All in all it was a WONDERFUL weekend!

Tuesday, August 19, 2014

Peanut Butter Rolo Cookies

If you want the best cookie recipe ever well, you're welcome! :)


Ingredients:
    1/2 cup (1 stick) salted butter, softened to room temperature
    1/2 cup packed dark brown sugar (or light brown)
    1/4 cup sugar
    1 large egg
    3/4 cup creamy peanut butter
    1 tsp. vanilla extract
    1/2 tsp. baking soda
    1 and 1/4 cups all-purpose flour
    24 Rolos

Instructions:
1. In a large bowl using a hand-held mixer or stand alone mixer, cream the butter and sugars together. Stir in the peanut butter, egg, and vanilla (in that order). Slowly mix in the baking soda and flour. Do not over mix. Chill the dough for 30 minutes.
2. Preheat oven to 350 degrees. Take 1.5 tbsp. scoop of the chilled dough and split in half. Wrap the cookie dough around a Rolo and roll into a ball. Repeat with the rest of the dough and all 24 Rolos. Bake for 9 minutes. Allow to cool completely on a wire rack.
Notes:
*You may use unsalted butter in this recipe. If so, add 1/4 tsp. salt with the flour.
Makes 2-dozen cookies.

*I topped mine with chocolate for fun, and it looks more appetizing I think, but optional.


Sunday, August 10, 2014

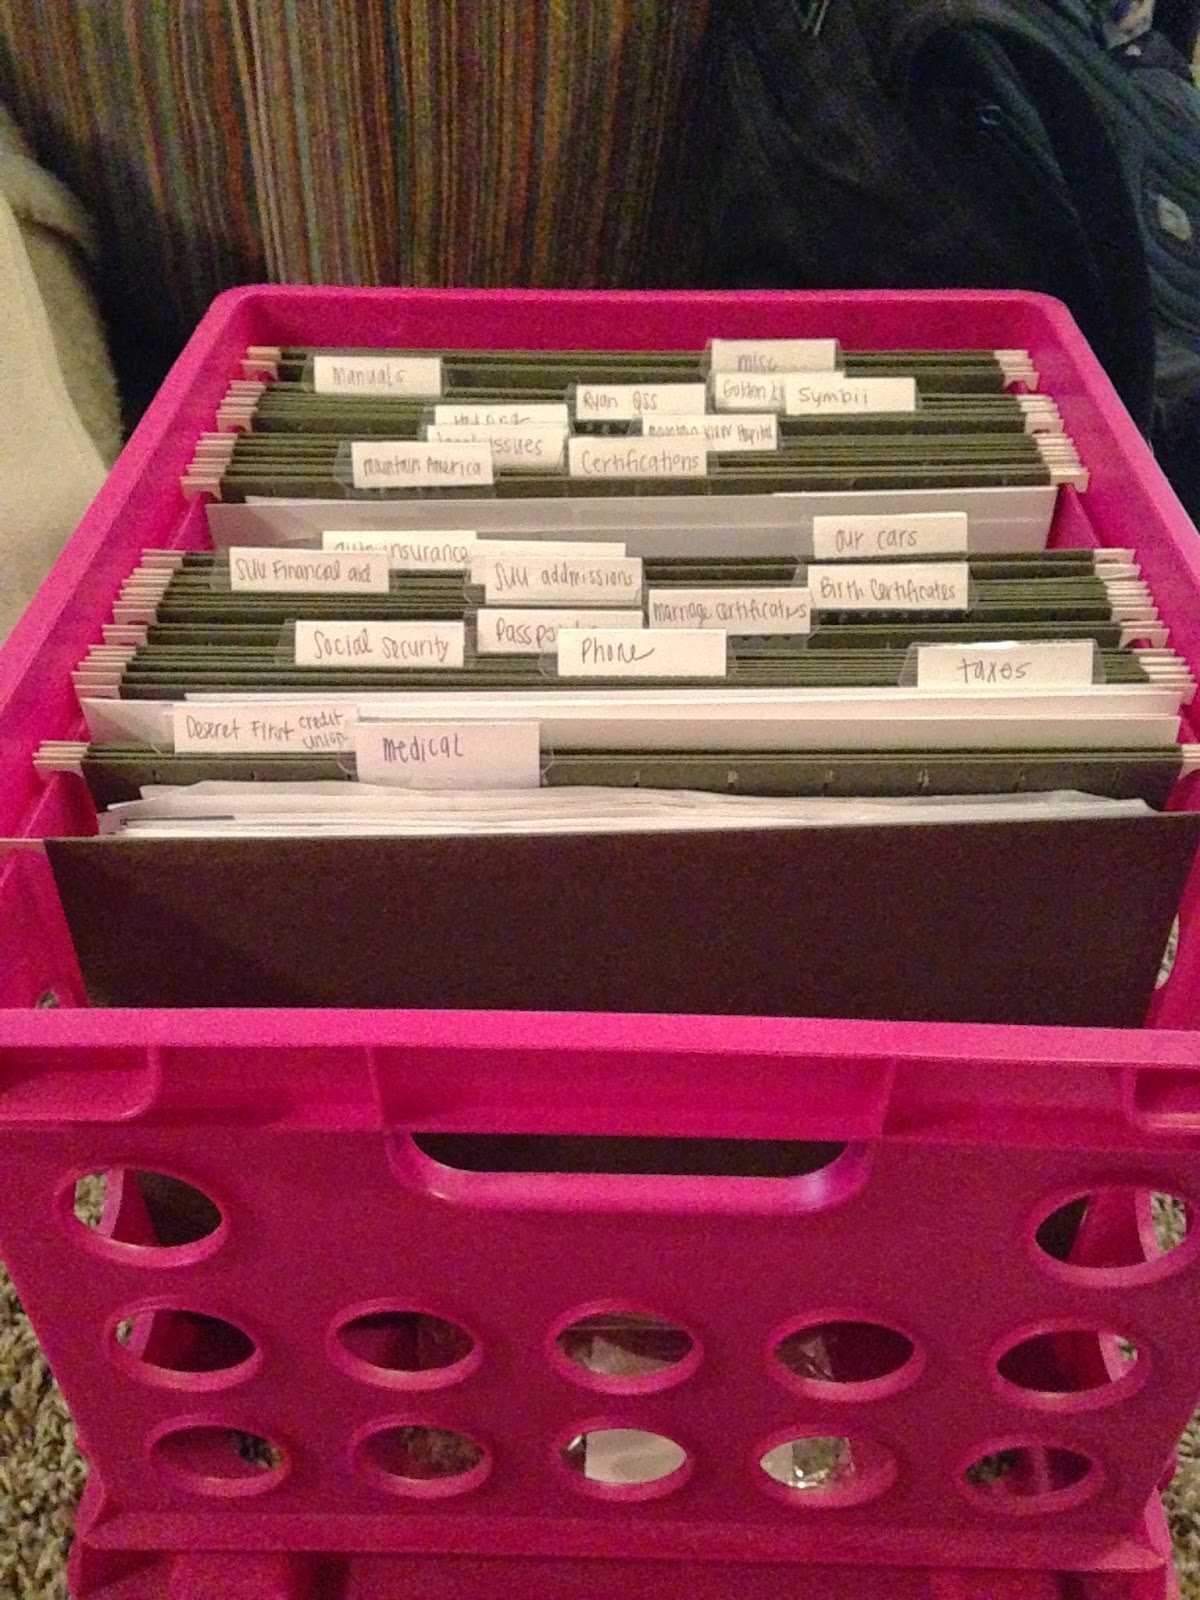
organizing important documents

When I moved out to college I started my own filing system. It has worked out really well for me! After Ryan and I got married I needed to combine our documents and make new tabs for the both of us. This is far from fancy but it treats me well. I hope you can find some extra help as well. 


First make a list of what kinds of documents you would like to file. Here are some of the ones I use.

Housing
Cars
Auto Insurance
Health Insurance
Banking
Our Jobs
Taxes
Medical
Schooling
Financial Aid
Manuels
Phone
Personal


Next file them in any order that you would like, alphabetical, categorized or color coordinated.
I filed them by categories and hopefully will be color coordinating when I have some time soon.

It may take a while to get it all set up but trust me it is well worth it!! It is so easy to find documents now and I don't loose them. 


Sundays

Need a good recipe for some chocolate chip cookies? You're welcome.


besides... I needed an excuse to use our adorable kitchenaid :)


Ingredients:

2 cups + 2 tablespoons all-purpose flour
1/2-teaspoon baking soda
1 + 1/2 stick salted butter, melted & cooled (Completely cooled, people!)
1-cup brown sugar
1/2-cup sugar
1 egg + egg yolk, at room temperature
2 teaspoons vanilla extract (none of that imitation crap.)
Chocolate chips, whatever kind you would like, as many as you would like.

Directions:
-Preheat over to 325 degrees F & melt butter, set aside to cool.
-Mix the flour & baking soda in a bowl & set aside. In another bowl, mix the cooled butter & sugars until they are combined. Add egg yolk, egg, & vanilla. Mix. Slowly add the dry ingredients. Fold in chocolate chips.
-Roll tall tablespoon balls & place on your cookie sheet. Bake for 8 to 11 minutes. Edges will be golden brown but the middle will be soft & puffy. Do not, do not, and do not over bake.


Enjoy!


Monday, August 4, 2014

Wedding Bells

Yay we are getting our pictures back! We have close to 1000 pictures so we have been getting batches of them back here and there. I am in love with them and I love reminiscing in the happiest day of our life. So Fun!

So because we have a thousand pictures I will just post a few :)


Thursday, July 24, 2014

Trying new things

Okay so Im going to admit, a year ago I bought a small little succulent with my bestie at a succulent party and I had no idea what I was doing. I thought for sure I would bound to kill the poor thing. To be honest I probably still don't know what I am doing. Anyways I eventually needed to repot my little plant into a bigger pot. I read up on how to do it and I tried it out. Good News! I didn't kill it! haha it survived and grew more too. Well we went to home depot today and I convince Ryan to look through the gardening section (love). We found a really cute pot and a really cute Cactus! We bought them and came home to repot my slow growing home garden.

So for any of you beginners out there. Although I am sure I am way behind the times.. Here is 5 easy steps for us not so talented urban-hipster gardeners.


1. Supplies
Cactus potting soil (Home Depot)
An adorable pot (Home Depot)
Your favorite Succulents or Cacti (Home Depot)


These are my plants. The green pot was the one I got a year ago from the succulent party and the cactus I got from Home Depot. They have a huge/cheap selection. Great for budgets.


2. Adding the Soil
Next fill your pot with the potting soil
(to make it a little easier fill it halfway, add plants, then finish filling)


3. Repotting old plants
If you are repotting an old plant take the plant out of the old pot and shake of the old dirt. 
BE CAREFUL
You don't have to break off the roots.
This is always the scariest part for me but don't worry to much.


4. Potting 
I potted my old plant first. I then added my new cactus. 
Now I am thinking I want to add two more plants. The pot is drowning them. haha
Pack down the soil a little bit, because your new plants will be a little wobbly.
Be careful, you don't want to pack it tight.

5. Watering
Add a little water after you have finished potting. Just to moisten the dirt.
Keep it it in some sunlight and water one a week. Twice if your garden is feeling super dry. 
I have literally gone 2-3 weeks without watering mine. forgetful mind. 
So don't feel horrible if you do too. Just water it and keep an eye on it.


Enjoy.